
Applicable Models:
📜 Quick Navigation
Start Up Procedure
- Before proceeding, ensure that all internal and external packaging has been removed from the cabinet, including any tape, plastic bags, and foam pieces.
- Next, take the supplied lead and plug it into a 20Amp, 5-pin, 3-phase wall socket.
- Check the direction of the fan motors.
- The controller will undergo a warm-up period before displaying the security screensaver (SOV mode).
Factory Settings:
- Upon first start-up, the temperature will be set at 0.0°C and heaters and fans are set off via the Oven Start/Stop setting.
Star-X Controller Guide
The STAR X touchscreen is the temperature controller used on the Large Capacity Drying Oven. Developed by Thermoline, it is designed for ease of use, system security, and traceability. Each controller features a unique identifier that links activity back to the specific instrument.
Operating Modes
SOV Mode (Safe Operating Value)

SOV Mode allows for basic continuous operation. A single setpoint temperature is maintained, with no programmed ramps, dwells, or timing.
Key Elements:
-
Safe Operating Value (SOV):
These are the default values the controller uses upon startup. The SOV is designed to ensure safe operation that won’t damage sensitive research materials. If power is lost, the controller will return to SOV Mode on restart. -
Actual Value:
This displays the real-time measured temperature inside the workspace. -
Program ON/OFF/Pause/Resume:
Located in the top-right drop-down menu, this allows you to start, stop, pause, or resume a Program or Diurnal Cycle. -
Oven Start/Stop:
Found in the bottom-right drop-down menu, this lets the operator activate or deactivate the oven’s heaters and fans.
PSV Mode (Program Set Value)

PSV Mode is used when running a temperature Program or Diurnal Cycle. This allows for multi-step control including ramps, dwells, and time-based transitions.
Key Elements:
-
Program Set Value (PSV):
The target value for each program step. This value cannot be changed directly from the main screen.NOTE: Adjustments must be made through the Program Set-Up Menu in the settings section.
-
Current Program:
Displays the name of the currently running Program or Diurnal Cycle. -
Current Step:
Shows which step in the Program is currently active. -
Step Time Remaining:
Indicates how much time is left in the current Program Step.
Alarms Overview

The STAR X controller is equipped with multiple alarms to ensure safe operation. Each alarm serves a specific safety function and must be understood and acknowledged correctly when triggered.
Types of Alarms and Functions
Temperature Deviation Alarm
-
Description: Automatically activates when the actual temperature differs from the SOV or PSV by more than 5°C.
-
Response: The heaters will turn off automatically.
-
Visibility: This alarm does not appear on the screen and does not require acknowledgment.
-
Reset Condition: Heaters will resume automatically once the temperature returns to a safe range.
Temperature High Alarm
-
Trigger Point: Activates when the Actual Temperature reaches 160°C.
-
Type: Latching alarm — the condition must be corrected before the alarm can be cleared.
-
Effect: Heaters will shut off.
-
User Action: User must acknowledge the alarm on screen for heater control to resume.
-
Set Point: Fixed — this alarm cannot be adjusted.
Temperature Safety Alarm
-
Description: Triggered by a secondary sensor located near the heating elements.
-
Trigger Point: Activates at 200°C.
-
Type: Latching alarm — requires manual correction and acknowledgment.
-
Effect: Heaters will shut off.
-
Set Point: Fixed — this alarm is not adjustable.
Note: This alarm also indicates fan failure when triggered alongside the manual safety reset sensors.
Humid Alarm (Optional Feature)
-
Condition: Activates when workspace humidity drops below the user-defined level (e.g., when a sample becomes "dry").
-
Effect: Heaters will shut off.
-
User Action: Must be acknowledged by the user to restart the heaters.
-
Visibility: Only shown when the oven is equipped with the optional humidity sensor.
Important Note
Both the Temperature Safety Alarm and the manual safety reset sensors share the same physical location. If either alarm is triggered, it may also indicate a fan failure.
Latching Alarm
A latching alarm remains active on the screen even after the triggering condition has returned to normal. The alarm will not clear automatically and will stay visible until the user manually presses the Alarm Acknowledge button. This ensures the operator is aware of the alarm condition and has taken the appropriate corrective action.
USB and Ethernet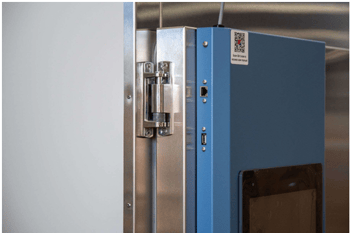
USB Downloading – Data Export

The STAR X controller allows for easy data export via USB. Simply insert a USB memory stick, and the controller will automatically begin downloading logged data.
How to Download Data:
-
Insert a USB memory stick into the controller’s USB port.
-
The system will begin downloading all available data automatically.
-
Do not remove the USB stick during this process.
-
Once the download is complete, a message will appear indicating that it is safe to remove the USB stick.
On-Screen Indicators:
-
During Download:
A red banner will appear stating:
"Alarm/Event & Data Downloading – Do Not Remove USB" -
After Download:
A green banner will appear stating:
"Safe to Remove USB"
These messages help ensure that data is not lost or corrupted during the download process.
File Format & Storage Details:
-
File Structure: Data is saved in monthly folders.
-
File Naming Format: Files are named using reverse date format (YYYY/MM).
-
Retention: Up to 12 months of data can be stored.
-
Data Logging Frequency: Logged every 1 minute.
-
Data Format: All exported files are in CSV (comma-separated values) format, compatible with most spreadsheet software such as Microsoft Excel and Google Sheets.
NOTE: Each controller uses a unique identifier, allowing data to be traced back to the corresponding instrument.
Settings Screen Access
The STAR X controller includes a Settings Screen where users can access all configuration and diagnostic functions.
Accessing the Settings Menu
From the Main Screen, press the Settings button located in the bottom-left corner of the display.

This will take you to the Settings Menu, where all available system functions are displayed.
Settings Menu Layout
The menu is divided into two access levels:
Top Two Rows – No Passcode Required:
These screens are accessible without a passcode:
-
Contact Details Screen
-
Data Menu Screen
-
Date, Time, Network & System Settings Screen
-
Temperature Trend Screen
-
Diagnostics
-
Alarm/Events Screen
Bottom Row – Passcode Protected:
To access the following advanced settings, a passcode is required:
-
Calibration Screen
-
Program Set-Up Screen
How to Enter Passcode
-
Touch the Thermoline logo in the bottom-right corner of the Settings Screen.
-
The User Access window will appear.
-
Enter the following:
-
User Number:
02 -
Passcode:
2222
-
-
Press Enter to unlock the protected options.
NOTE: After you exit the Settings Menu, you will need to re-enter the passcode to access the protected sections again.

Contact Details Screen
If you need to get in touch with Thermoline for support, service, or general inquiries, all contact information is available via the Contact Details Screen.
To access this screen, press the Contact Details button located on the Settings Menu.

Alarm/Events Screen
The Alarm/Events Screen is accessible through the Settings Menu and is passcode-protected.
This screen provides a detailed log of all alarms and system events that occur within the STAR X controller, including:
-
Alarm activations and resolutions
-
User logins and access to protected screens
-
Activation or deactivation of system functions by the operator
Reading the Log:
-
Red entries indicate when an alarm or event occurred.
-
Green entries show when the alarm or event has been cleared or returned to normal.
This log is essential for troubleshooting, tracking system usage, and maintaining audit trails.
Note: Ensure you are logged in with the appropriate credentials to access this screen.

Trend Screen
The STAR X controller includes two types of trend displays: a graph view and a data table view. These tools provide a visual and tabular representation of the cabinet’s daily performance, helping users track temperature and humidity over time.
The controller can store up to 365 days of logged data for trend analysis.
Accessing the Trend Screen

From the Settings Menu, press the Temperature Trend Screen button to open the trend display.
Use the legend on the left of the graph to identify the data lines:
-
Red: Actual Temperature
-
Green: Temperature PSV (Program Set Value)
-
Blue: Temperature SOV (Safe Operating Value)
-
Purple: Actual Humidity
Adjusting Trend View
1. Change the Displayed Month
To view data from a different month:
-
Press the Settings (cogwheel) icon in the top right of the graph.
-
Select the desired date range or month from the list.

2. Adjust the Graph Scale
To zoom in or out on the graph's Y-axis:
-
Use the scale adjustment button located just below the settings icon.
-
This helps improve readability when working with large temperature or humidity ranges.

TIP: Use the Chart Time Scale feature to zoom into a specific portion of the graph for a more detailed view of performance trends.
Data Menu Screen
The STAR X controller also provides a Trend Table View via the Data Menu Screen, offering a tabulated display of historical data.

NOTE: This screen requires access credentials:
User Number:01
Passcode:1111
Accessing the Data Menu:
From the Settings Menu, press the Data Menu Screen button.
This view is ideal for reviewing detailed daily values and is especially helpful when exporting or analysing trends in spreadsheet form.

Features:
-
Settings (Cog) Icon:
Tap the cogwheel icon in the top right to select a specific month or view all available data by selecting (Current). -
Data Columns:
The table displays time-stamped records for:-
Actual Temperature
-
Program Set Value (PSV)
-
Safe Operating Value (SOV)
-
Actual Humidity (if equipped)
-
Diagnostics Screen
The Diagnostics Screen is designed to assist operators in troubleshooting performance issues or irregular operation.

Functionality:
-
Displays the percentage output of each control function.
-
Helps identify problems with cabinet operation, such as temperature control inefficiencies or sensor inconsistencies.
-
Serves as a real-time performance snapshot for technicians or advanced users.
Service Use:
The diagnostics screen can also be used by service personnel to reactivate heater functions during maintenance.
⚠️ Note: This action is performed through the Service Menu, which is not covered in this manual and is not accessible by general users.
System Settings Screen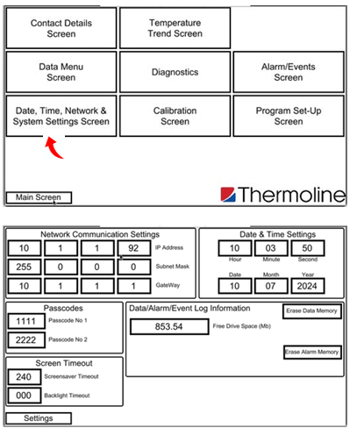
NOTE: To access this screen, use:
User Number:02
Passcode:2222
The System Settings Screen allows users to view and adjust core parameters including network communication, date and time, memory usage, screen timeout settings, and passcodes.
Accessing the System Settings Screen
From the Settings Menu, press the Date, Time, Network & System Settings Screen button.
From this screen, users can:
-
View and set network parameters (IP address, subnet mask, gateway)
-
Adjust date and time settings
-
Configure screen timeout and backlight duration
-
Check data log memory usage
-
Change user passcodes
System Settings Functions
Screen Timeout
-
Screensaver timeout: Adjustable from 1 to 255 minutes.
-
Backlight timeout: Adjustable from 0 to 255 minutes.
-
Setting to 0 minutes disables the timeout and keeps the screen always lit.
-
Passcode Management
-
User 1 Passcode: Used to exit screen saver mode.
-
User 2 Passcode: Required to access the System Settings, Program Set-Up, and Calibration screens.
-
Passcodes can be updated from this menu.
⚠️ IMPORTANT:
Thermoline is not responsible for lost or forgotten passcodes. If a passcode is lost, a factory reset will be required to regain access.
This will erase all previously logged data.
Log Information
-
Displays the amount of available memory on the controller before data is overwritten.
-
Also shows how many days of data can be stored (up to 365 days).
-
The size of data files determines memory usage.
Data Erase Note
The Erase button must be held for at least 10 seconds to prevent accidental data deletion.
System Settings (Network, Time & Date)
Network Settings
Displays the IP address once the STAR X touchscreen is connected to a network.
This information is found in the System Settings Screen.
Time and Date Settings
To adjust the time or date:
-
Touch the parameter you wish to change.
-
Enter the correct time or date.
NOTE:
-
The STAR X does not automatically adjust for daylight saving time. Adjustments must be made manually.
-
The values entered here are used for data logging. If incorrect, all log files will reflect the wrong time and date.
LAN Connection
Thermoline cabinets equipped with a STAR X controller can connect to a LAN (Local Area Network), allowing the screen to be cloned and viewed remotely.
-
By default, the STAR X controller is set to automatically assign an IP address when connected to a network.
-
The assigned IP address will appear in the System Settings Screen.
If you require a manual IP address configuration, please contact Thermoline for detailed instructions and support.
Calibration Screen

IMPORTANT: Calibration should only be performed by a trained service technician.
The STAR X touchscreen includes a simple single-point calibration adjustment. This allows for fine-tuning the temperature and humidity readings using a known reference device.
Accessing the Calibration Screen
Access is passcode protected.
To enter:
-
Tap the Thermoline logo on the main screen.
-
Enter:
User Code:02
Passcode:2222
Then select the Calibration Screen from the Settings Menu.

How to Calibrate

-
Place a calibrated reference device in the center of the oven workspace.
-
Allow the system to stabilise, then compare the screen reading (PV) with the reference device.
-
On the calibration screen, tap the offset window for the value you wish to adjust:
-
Temperature
-
Humidity
-
Heater Safety
-
-
Enter the difference between the STAR X reading and the reference value using the on-screen keypad.
-
Press Enter to save the adjustment.
This process ensures the displayed values accurately reflect the actual conditions inside the chamber.
Temperature Control
NOTE: To access this screen, use:
User Number:01
Passcode:1111
The STAR X touchscreen allows for quick and straightforward adjustments to the temperature and, if equipped, humidity alarm values.

How to Adjust the Temperature:
-
From the Main Screen, tap the Safe Operating Value (SOV) or value you wish to change.
-
The numeric keypad will appear.
-
Enter the desired value and press Enter to confirm.
IMPORTANT:
-
This function is only available in SOV Mode.
-
To adjust values in PSV Mode, use the Program Setup screen.
-
The maximum temperature that can be set is +150°C.
Program Setup
NOTE: To access this screen, use:
User Number:02
Passcode:2222
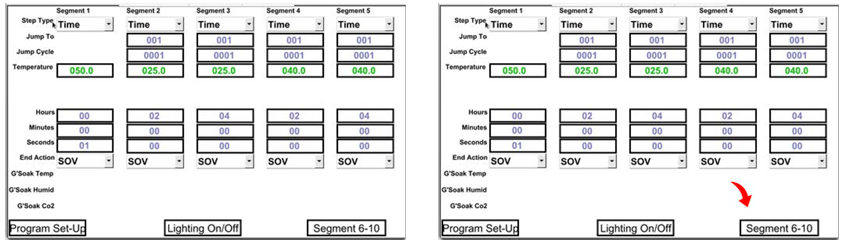
The STAR X features a 250-segment programmable controller, divided into up to 25 Programs (with a maximum of 10 segments per program).
Segment Types
Each segment in a program can be one of the following:
-
Time:
Defines how long the segment will run (set in hours, minutes, and seconds). -
Jump To:
Allows the program to jump to another segment. This is used to create repeat loops or conditional steps. -
End:
Marks the end of the program. Omitting an End segment will result in the program indefinitely holding the final segment.
Other Program Parameters
-
Jump To:
Enter the segment number to return to when using a Jump To segment type. Ignored for Time or End segments. -
Jump Cycle:
Defines how many times the controller will repeat the Jump To loop. A value of 0 causes the cycle to repeat indefinitely until manually stopped. Ignored for Time or End segments. -
Temperature:
Enter the target temperature for the segment. Not required for Jump To segments. -
Lighting On/Off:
(Not used.)
Time & End Action Settings
When configuring each segment of a program, you can specify the duration of the segment and define the behavior at the end of the program.
Segment Duration Settings
-
Hours:
Enter the number of hours the segment should run.Ignored if the segment type is Jump To or End.
-
Minutes:
Enter the number of minutes for the segment duration.Ignored if the segment type is Jump To or End.
-
Seconds:
Enter the number of seconds for the segment duration.Ignored if the segment type is Jump To or End.
End Action
This setting determines the controller’s behavior once the program finishes:
-
SOV (Safe Operating Value):
Ends the program and reverts control back to the Safe Operating Value mode. -
Dwell:
Maintains the temperature setpoint of the final Time segment indefinitely. The program will not end until manually stopped.
Use this setting to control whether the oven stops automatically or continues maintaining conditions for extended holding periods.
Setting Up the Cycle

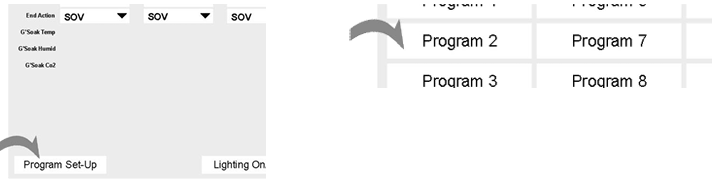
To program and run temperature cycles, access the Program Set-Up Screen from the Settings Menu.
Navigation:
From the Settings Menu, press the Program Set-Up Screen button (passcode required).
NOTE:
You must use User Code02and Passcode2222to access this screen.
Program Structure

The STAR X controller allows you to configure up to 25 individual programs, each containing 10 segments.
Program-to-segment mapping:
-
Program 1 → Segments 1–10
-
Program 2 → Segments 11–20
-
Program 3 → Segments 21–30
-
Program 4 → Segments 31–40
-
(...and so on up to Program 25)
Starting a Program
-
On the Program Set-Up Screen, tap the button for the desired program (e.g., Program 1).
-
The Start Program Number field will display your selected program.
-
Press Start Program Cycle to begin the selected cycle.
In this example, the controller is set to start at Program 1.
Setting Up the Program
When programming the STAR X controller, it’s important to understand how each segment functions and how the controller interprets time and temperature changes.
Ramp Rate Explained
Each segment operates with a ramping action—meaning the controller will increase or decrease the temperature gradually over the time you set for that segment.
-
For example, if the temperature needs to change from 50°C to 100°C over 2 hours, the ramp will occur gradually throughout the 2-hour duration.
-
If you want the temperature to change as quickly as possible, set the time to 1 second. This essentially removes the ramp and applies the new temperature immediately.
TIP:
Use the following segment after a rapid change as a dwell segment, allowing the oven to hold the setpoint for a specific time.
Starting Temperature
The first segment of every program (Segment 1 in Programs 1–25) begins using the Safe Operating Value (SOV) as the starting point. This ensures consistency across all programs.
Segment Editing Overview
Each segment contains editable fields including:
-
Time (Hours, Minutes, Seconds)
-
Temperature Setpoint
-
Jump To / Jump Cycle / End Action
-
Optional: Humidity, CO₂ (if enabled)
The diagram to the right shows all editable parameters for one segment.
Programming Example:
Let’s say you’ve selected Program 1. Here's how a sample sequence might look:
-
Segment 1:
Start at 50°C with a time of 1 second (instant temperature set). -
Segment 2:
Maintain 50°C for 2 hours. -
Segment 3:
Maintain 50°C for 4 more hours. -
Segment 4:
Ramp up to 100°C over 2 hours. -
Segment 5:
Hold 100°C for 4 hours. -
Segment 6:
Ramp to 150°C over 2 hours. -
Segment 7:
Hold 150°C for 4 hours. -
Segment 8:
End program — return to SOV.
Finalising Your Program
Once you’ve configured a segment:
-
Move to the next one to continue editing.
-
When all segments are complete, press the button at the bottom of the screen to save and continue.
Linking the Programs

If your temperature control requirements exceed the 10 segments available in a single program, you can link multiple programs together.
How It Works:
-
Programs will automatically transition from one to the next if:
-
The final segment of the current program is a Time segment (or a Jump To with a finite cycle).
-
No End segment is used in the current program.
-
This allows you to seamlessly extend the control process across multiple programs without interruption.
Program Continuation Options
After configuring your program, you have three options:
-
End the Program – return control to the Safe Operating Value (SOV).
-
Link to Another Program – automatically continue with the next program in sequence.
-
Repeat the Same Program – loop back and repeat the current program as needed.
Ending the Program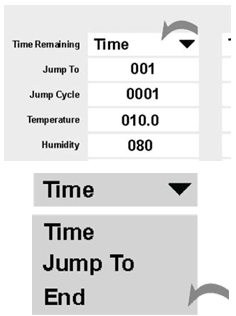
To properly end a program cycle in the STAR X controller, you must set the final segment's Segment Type to End using the drop-down menu.
How to Set an End Segment:
-
In the final segment of your program, open the Segment Type drop-down.
-
Select End from the list of options.
-
All other parameters in that segment (e.g., time, temperature) will be ignored.
This tells the controller to terminate the program cycle once it reaches that segment.
Post-Program Actions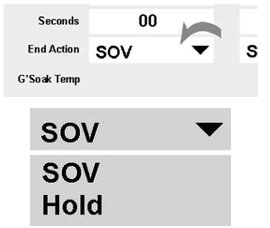
After the program ends, you can define how the cabinet behaves:
-
Return to SOV:
The system reverts to the Safe Operating Value setpoint. -
Hold Last Segment:
The system maintains the final set temperature (dwell) until manually changed.
To configure this:
-
Use the End Action drop-down menu.
-
Choose either SOV (return to default) or Dwell (hold last setpoint).
Repeating the Program
To repeat a program (or part of it) without linking to another program, use the Jump To feature available in the Segment Type drop-down menu.
How to Set Up a Repeat Cycle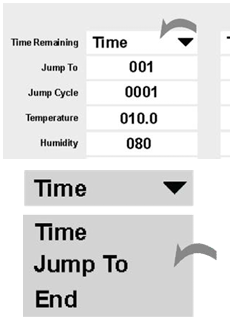
-
In the desired segment, open the Segment Type menu and select Jump To.
-
You will then see two additional parameters:
-
Jump To:
Enter the segment number the program should return to. -
Jump Cycle:
Enter the number of times the cycle should repeat.
-
NOTE: Setting the Jump Cycle to
0will create an infinite loop that must be manually stopped.
Example Setup
To repeat Segment 5 a total of 6 times:
-
Set Jump To =
005 -
Set Jump Cycle =
0006
The program will loop back to segment five and repeat it six times before continuing.
Starting/Stopping the Program

Once you’ve set your temperature program and all required values, you can activate and run the cycle. The STAR X controller allows you to start the program in two ways:
-
Via the Program Set-Up Screen
-
Directly from the Main Screen
Both options are outlined below.
Starting a Program from the Set-Up Screen
-
On the Program Set-Up Screen, locate the Start Program Cycle drop-down menu at the bottom.
-
In the Start Program Number field, enter the number of the program you wish to run (from 001 to 025).
This field can only be edited from the Program Set-Up Screen—not the Main Screen.
-
From the drop-down menu, select START.
-
The indicator will change from Program OFF (red) to Program ON (green).


Starting a Program from the Main Screen
-
On the Main Screen, access the drop-down menu in the top-right corner.
-
Select START from the list of available actions.
-
The main display will update to show Program ON, confirming that the cycle has begun.
Program Action Options
The Start/Stop drop-down menu offers four key actions:
-
START – Launches the selected program from the beginning.
-
END – Stops the current program.
-
PAUSE – Temporarily halts the program and holds its current state.
-
RESUME – Continues the program from where it was paused.
If START is selected while the program is paused, it will restart from the beginning.
Manual Reset Safety Thermostat
The over-temperature safety thermostat is not operator adjustable. It will electrically isolate the heating elements in the event of an over-temperature condition. This safety feature prevents overheating if airflow is blocked, which may occur due to air circulation fan failure or overstocking of the cabinet. There are two MRST's in the TD-1200 and TD-2400 located at the back of the cabinet.
For instructions on resetting the safety thermostat, refer to the manual.
