
Applicable Models:
TRH-300-GD/SD
TRH-460-GD/SD
TRH-850-GD/SD
TRH-XL-GD/SD
TEC-460-SD
TEC-850-SD
Temperature and Humidity Control
Start-Up Screen Saver
The screensaver appears when the device powers up or the touchscreen cycles power. Follow these steps to reach the Main Screen:
- Exit the Screensaver: To proceed, input the security code.
- Access Passcode Entry: Tap the Thermoline logo displayed on the screensaver to enter the passcode.

At this point, you should see the User Access window below.

To enter the passcode:
- Tap the passcode section on the right column and use the numeric keypad to enter the code.
Note: For this part of the STAR X controller, use User Number '01' and Passcode '1111'.

After entering the passcode, press anywhere above the Thermoline logo to continue to the main screen and then close the User Access window.
See the video below of this step.
After entering the passcode, you will be directed to the screen where you can adjust the setpoints.
SOV Mode

-
Single Setpoint Mode: This mode sets a single temperature, humidity, and CO₂ (if available) level, allowing the cabinet to operate continuously without ramp, dwell, or timer actions.
-
Safe Operating Value (SOV): The values under "Safe Operating Value (SOV)" are the initial setpoints the controller uses upon startup. SOV mode ensures a safe environment that protects research in case of power failure (including alarm battery). The cabinet defaults to this mode in such events.
-
Actual Value: Shows the current measured temperature, humidity, and CO₂ levels in the workspace.
-
Program ON/OFF/Pause/Resume: Located in the top right corner, this dropdown allows you to Start, End, Pause, or Resume a Program/Diurnal Cycle.
-
Humidity/CO₂ ON/OFF: Located below the Program dropdown, these options let you turn the Humidity and CO₂ functions on or off.
-
Lights SOV Mode: Not used.
PSV Mode

-
Program Set Value (PSV): Displays the set values during an active program. These values cannot be modified directly on this screen and must be adjusted in the Program Set-Up through the settings menu.
-
Current Program: Shows the currently running program, visible only when a Program/Diurnal Cycle is active.
-
Current Step: Displays the current step in the active program, visible only when a Program/Diurnal Cycle is running.
-
Step Time Remaining: Indicates the remaining time for the "Current Step," visible only when a Program/Diurnal Cycle is active.
Note: Ensure that the Humidity and CO₂ functions are activated before starting the program.
Alarms
The STAR X is equipped with various alarms. The instructions below will run through each alarm and its primary function.
NOTE: You must log into the main screen to mute and acknowledge alarms.
Latching Alarm: A "latching alarm" means that once the alarm is triggered, it will remain visible even if conditions return to normal, until the Alarm Acknowledge button is pressed. The alarm can be muted, but it will reactivate after 15 minutes if the issue persists and the alarm hasn’t been acknowledged

-
Power Fail: The STAR X controller includes a battery backup for power failures, providing power to alarms and the touchscreen for around 24 hours. If the power outage extends and you need to shut off the cabinet and alarms, follow the shutdown procedure outlined in the manual.
-
Battery Fail: The STAR X touchscreen automatically checks battery health every 7 days. During this 5-minute test, if the battery voltage drops below 22Vdc, a battery alarm will activate, indicating the battery may need replacement.
-
Temperature Deviation Alarm: If the actual temperature deviates from the SOV or PSV beyond the set tolerance and for longer than the alarm delay time, a visual and audible alarm will activate. This is a latching alarm and must be corrected before it can be cleared or acknowledged.
-
Humidity Deviation Alarm: If the actual humidity deviates from the SOV or PSV beyond the set tolerance and for longer than the alarm delay time, a visual and audible alarm will activate. This alarm is disabled if the humidity function is off. It is also a latching alarm and needs correction before clearing or acknowledging.
-
Carbon Dioxide Deviation Alarm: If the actual CO₂ level deviates from the SOV or PSV beyond the set tolerance and for longer than the alarm delay time, a visual and audible alarm will activate. This alarm is disabled if the CO₂ function is off. It is a latching alarm and requires correction before it can be cleared or acknowledged.
Notes:
- If alarms and issues persist, contact a trained and qualified service technician.
- The system includes high and low safety alarms for temperature that will stop all heating if there is a high alarm and all cooling for a low alarm. These settings are not user-adjustable.
USB and Ethernet
The cabinet includes a built-in USB and Ethernet connection, positioned on the left side of the fascia panel for easy access. Refer to the image below for identification.

USB Downloading

To download data from the STAR X controller:
-
Insert USB: Insert a USB stick, and the data will automatically start downloading. Do not remove the USB stick until you see a message indicating that it is safe to remove. Data is logged every minute, with each file named by date (YYYY/MM). Up to 12 months of data can be stored.
-
Download Progress: When downloading, the screen will display a red banner with "Alarm/Event & Data Downloading - Do not Remove USB." Once complete, a green banner with "Safe to Remove USB" will appear.
-
Data Format: Downloaded data is saved in CSV format, which is suitable for use in spreadsheet applications.
Note: The unique identifier on the data allows traceability back to the instrument.
Settings Screen

To access the settings from this screen, simply press the Settings button located on the bottom left. From here, you can access all other functions present on your STAR X.
No passcode is needed to access functions in the first two rows. However, the bottom row options are passcode-protected. To access them, touch the Thermoline logo in the bottom right corner to open the User Access window. Use User Number 02 and Passcode 2222.
NOTE: After exiting, you will need to enter the passcode again to access these sections.
Contact Details Screen

If you need to contact Thermoline for any reason, our contact details are available by pressing the Contact Details Screen button on the settings page.
Trend Screen

The STAR X controller offers two types of trend screens: a graph and a data table. These screens display a daily live trend of the cabinet’s performance. To view historical trends, press the settings button (cog) and select the desired date. Use the Chart Time Scale to examine the trend in more detail. The STAR X can store up to 365 days of logged data.
The Trend Screen for Temperature and Humidity includes a legend on the left side to identify each line.

On the trend screen, you can use the cog button to change the month shown on the graph.

There is also scale adjustment using the arrows button shown below.

CO2 Trend Screen - Optional
The below screen is the Trend Screen for the optional CO2. Use the legend on the left-hand side to identify the lines.

Data Menu Screen
The STAR X also features the Trend Screen in a table format.

On the data menu screen you can use the cog button to change the month shown on the table. You can also choose to see all data by selecting (Current).

Diagnostics Screen

The Diagnostics screen assists the operator in troubleshooting by displaying the percentage output of each control function. This is a helpful tool for diagnosing issues when the cabinet is not functioning properly.
Additionally, the diagnostics screen allows for the reactivation of heaters if they have been adjusted by a service technician in the service menu. Note that the service menu is not covered in this manual and is not accessible to users.

System Settings Screen
Use the User Number ‘02’ and the Passcode ‘2222’ to access this screen.

To access the system settings screen, simply press the System Settings button in the Settings menu. From this screen, the user is able to see the Network Communication Parameters, Time, Date, Memory Information and Screen Saver Timeouts. The user is also able to change passcodes from this screen.

-
Network Settings: Displays the network address once the touchscreen is connected to a network.
-
Date and Time Settings: To adjust the date and time, tap the relevant parameter and enter the desired date and time.
Note: The STAR X does not automatically adjust for daylight savings; this must be done manually. The time and date settings are used for data logging. If they are incorrect, the logged data will reflect the wrong time and date.
-
Screen Timeout: The screensaver and backlight timeout settings can be adjusted from 1 to 255 minutes. Setting the backlight timeout to 0 will disable this feature, keeping the screen illuminated.
-
Passcodes: Passcodes can be modified if needed. Passcode 1 (User 1) is required to exit the screensaver, while Passcode 2 (User 2) grants access to calibration, system settings, and the program screen.
Note: Thermoline is not responsible for lost passcodes. Forgotten passcodes require a factory reset, which erases all logged data.
-
Log Information: Displays available memory for data logging. The number of days stored can reach up to 365, depending on the data size.
Note: To erase data, hold the data erase button for at least 10 seconds to prevent accidental deletion.
LAN Connection
Thermoline cabinets with the STAR X controller can connect via a LAN to clone the screen, allowing remote viewing. By default, the STAR X automatically assigns an IP address when connected to an active network, which is visible on the System Settings page. For a manual IP address, contact Thermoline for assistance.

Connect to a Local Area Network
To connect your cabinet to the network for remote logging, you’ll need to provide the MAC address to your IT department.
To locate the MAC address:
- Press the hidden button in the top left corner of the touchscreen.
- The button is located near the area indicated by the finger icon in the image below.

The hidden settings screen will appear. Scroll down through the Ethernet 1 settings until the MAC address is visible. Provide this MAC address to your IT department to enable network connectivity for your chamber.
Note: Thermoline does not use the Ethernet 2 port.

This will display the MAC address of your chamber for network setup.
When logging in via VNC viewer, you will be directed to a web login page. Use the following credentials:
- Username: admin
- Password: 111111
Calibration Screen
It is advised that all calibrations be made by a trained service technician.

The Thermoline touchscreen includes a one-point calibration adjustment. Access to the Calibration Screen is passcode-protected. To access it, simply tap the Thermoline logo to open the User Access window.
NOTE: Use the User Code ‘02’ and the passcode ‘2222’ to access this screen.

Note: The deviation alarm settings are also available on the calibration screen. The maximum time delay is 1800 seconds.
How to Calibrate
To adjust the calibration, simply press the offset window you require to adjust.

Use a calibrated reference device in the centre of the workspace and then compare that reading to value the screen. Then, enter the difference between the PV and your calibrated device.
Temperature and Humidity Control
The Thermoline touchscreen has been fitted with a simple temperature control system, allowing for quick and easy adjustments to the cabinet temperature and humidity levels (plus CO2 if the option is fitted).

From the main screen of the STAR X, simply press on the value you wish to change.
The next screen will show the numeric keypad over the top of the main screen.

This feature operates only when the controller is in SOV mode. To change values in PSV mode, access the Program Set-up feature.
Program Setup
NOTE: Use the User Code ‘02’ and the passcode ‘2222’ to access this screen.

The STAR X has a 250-segment Programmer. The 250 segments are split between 25 Programs (10 segments per program).
-
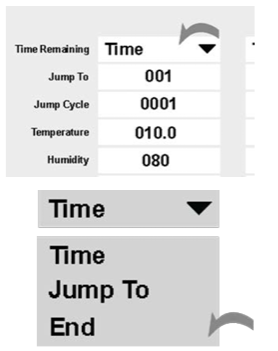
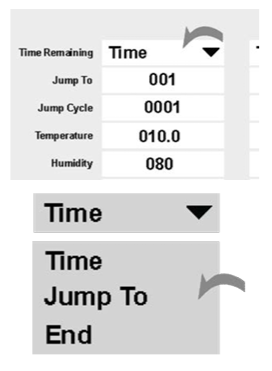
Segment Type: Each segment can be set as Time, Jump To, or End.
- Time: Sets the segment duration in hours, minutes, and seconds.
- Jump To: Repeats a predefined set of segments by specifying a segment number to return to.
- End: Ends the program. If no end segment is set, the controller will dwell indefinitely on the last segment.
-
Jump To: Enter the segment number the program should return to. Ignored if the segment type is Time or End.
-
Jump Cycle: Set how many times the "Jump To" repeats. A value of 0 will repeat the segments until manually stopped. Ignored if the segment type is Time or End.
-
Temperature: Set the target temperature. Ignored if the segment type is Jump To.
-
Humidity: Set the target humidity. Ignored if the segment type is Jump To.
-
CO₂: Set the target CO₂ level. Ignored if the segment type is Jump To.
-
Lighting On/Off: Not used. (See the Humiditherm with Lights article for this feature)
Program Setup
-
Hours: Enter the duration of the segment in hours. Ignored if the segment type is Jump To or End.
-
Minutes: Enter the duration of the segment in minutes. Ignored if the segment type is Jump To or End.
-
Seconds: Enter the duration of the segment in seconds. Ignored if the segment type is Jump To or End.
-
End Action: Defines what occurs when the program ends.
- SOV: Stops the program and maintains Safe Operating Value controls.
- Dwell: Continues to control the last segment’s Temperature, Humidity, and CO₂ levels.
Setting Up the Cycle
The Program Set Up Screen allows access to 25 programs, each consisting of 10 segments:
- Program 1: Segments 1-10
- Program 2: Segments 11-20
- Program 3: Segments 21-30
- Program 4: Segments 31-40
- And so on, up to Program 25.

Once on this screen, you can select from the 25 programs available. In this example we start at program 1.
Setting Up the Program

-
Segments operate in "ramping" mode, meaning the time set for each segment is the duration for reaching the target setpoint. The cabinet will adjust temperature, humidity, and CO₂ at a steady rate over this time.
-
To eliminate ramping, set the segment time to 20 minutes, which allows the cabinet to heat or cool as quickly as possible. This setup is useful for achieving a "dwell period" after rapid adjustment. A 20-minute duration helps prevent nuisance alarms, though it can be adjusted as needed.
-
Note that Segment 1 in each program uses the SOV (Safe Operating Value) as the starting temperature.
Each column represents an editable segment, allowing adjustments to temperature, humidity, CO₂, and duration for each segment. The editable features shown on the right include:
- Jump To: Segment to jump back to.
- Jump Cycle: Number of repetitions for the jump.
- Temperature: Target temperature.
- Humidity: Target humidity level.
- CO₂: Target CO₂ level.
- Hours, Minutes, Seconds: Duration of the segment.
- End Action: Determines action at the end, such as returning to SOV.
Example Program Setup:
- Program 1 begins at 22°C and 60% RH for Segment 1, holding for 20 minutes.
- The next segment continues for 5 hours, then ramps to 40°C and 30% RH over another 5 hours.
After completing your edits for each segment, proceed to the next segment and continue. Once all segments are edited, press the button shown below to move to the next screen.

- Segment 8 is set to "Jump To" Segment 2 with infinite cycles, creating a loop.
- An End Segment will return the cabinet to the SOV temperature if included. In this example, infinite repeats prevent reaching the End Segment.

Linking the Programs
If 10 segments are insufficient, you can link programs together. As long as you haven’t set an end segment and the final segment is a Time segment (or a "Jump To" with a finite repetition), the program will automatically transition to the next one.
After setting up your program, you can choose to end it, link it to another, or repeat the same program.

For example, if your program needs 15 segments, you can use all 10 segments of Program 1 and the first 5 segments of Program 2, setting segment 15 (the 5th segment in Program 2) as an End segment.
To link programs, go to the Program Set-Up screen, select the next program you want to link (e.g., Program 2), and edit its parameters.

Note: It’s important to end any linked program with an End segment to avoid unintentional looping.
Ending the Program
To end a program, select "End" from the drop-down menu. This will conclude the cycle at that segment, ignoring any parameters in the segment.
After ending the program, you can choose to:
- Return to SOV: Set the cabinet back to Safe Operating Value (SOV) conditions.
- Hold: Maintain the parameters from the final segment.
To set this, go to the End Action drop-down menu and select either "Hold" or "SOV."

Repeating the Program
To repeat a program without switching to another, use the "Jump To" option in the drop-down menu.
- Set the Jump To Parameter: Select the segment you want to loop back to.
- Set the Jump Cycle: Enter the number of repetitions. A Jump Cycle of 0 will create an infinite loop.

Example: To repeat from Segment 5, set "005" in Jump To and "0006" in Jump Cycle to repeat six times.
Starting/Stopping the Program
After setting the desired parameters, you can activate the program using one of two methods provided by the STAR X:
- From the Program Set-Up Screen: Locate the "Start Program Cycle" drop-down menu at the bottom of the screen.
- From the Main Screen: Instructions for both methods are detailed below.

The drop-down menu provides four options for program control:
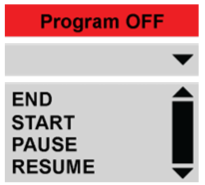
- End: Stops the running program.
- Start: Initiates the selected program.
- Pause: Pauses the program at its current point. Selecting "Start" while paused will restart the program from the beginning.
- Resume: Continues the program from where it was paused.
To start the program, simply press the START key once it has been selected. The previously RED indicator will become GREEN and display Program ON.

To start on a specific program, access the Program Set-Up screen and change the number in the Start Program Number box shown below.

-
The program number can only be changed from the Set-Up screen, not the Main Screen, and must be between 001 and 025.
-
To start a program from the Main Screen, select "START" from the drop-down menu. The Main Screen will then display the program as "ON."
Note: Ensure Humidity and CO₂ are turned on before starting the program if needed.

